Good news to OBDSTAR X300 DP (key master DP) tablet key programmer users, free update BMW FEM/BDC key programming.
X300 DP BMW FEM/BDC Key Programming
Function:
BMW FEM/BDC
1.Key Programming
●Key Information
●Key Programming Preprocessing
Step 1: Code data backup
Step 2: EEPROM Original Data Backup
Step3: Service Mode Data Generation
Step 4:Service Mode Writing
Step 5: FEM/BDC Module Programming
Step 6: EEPROM Original Data Recovering
Step 7: Code Data Recovering
●Key Adding
●Key Delecting
●Function Introduction
● Operation Guide
2. Other Function
● Key enable
● Key disable
● Key status
●Key frequency
●INS reading
●DTC reading
●DTC delecting
OBDSTAR X30 DP BMW FEM/BDC key Programming Supported list:
Series Chassis Year
1 F20/F21 2011-2017
2 F22/F23/F45/F46 2014-2017
3/GT F34/F35 2012-2017
4 F30/F31/F32/F33/F36 2014-2017
X5 F15 2014-2017
X6 F16 2014-2017
Note: Both OBDSTAR X300 DP full and standard version can update this function for free. OBDSTAR X300 Pro3/key master cannot.
OBDSTAR Upgrade Announcement of December (2018-01-05)
New Adding:
IMMO added Russian language.
IMMO added Bentley Mucha 6.8L smart key programming (only for Key Master and Key Master DP).
Diagnosis first added BMW, Rolls-Royce, MINI software (only for Key Master DP).
BMW added the car list:
1 series E81、E82、E87、E88、F20、F21
4series F32、F33、F36、F82、F83
5series E28、E34、E39、E60、E61、GT_F07、F10、F11、F18
3series Z1_E30、Z3_E36、E46、E90、E91、E92、E93、F30、F31、F34、F35、F80
2series F22、F23、F45、F46、F87
6series E24、E63、E64、F06、F12、F13
7series E23、E32、E38、E65、E66、E68、F01、F02、F03、F04、G11、G12
8series E31
I series I01、I12
X1series E84、F48、F49
X3series E83、F25
X4series F26
X5series E53、E70、F15、F85
X6series E71、E72、F16、F86
Z1series Z1_E30
Z3series Z3_E36
Z4series Z4_E85、Z4_E86、Z4_E89
Z8series Z8_E52
MINI added the car list:
MINI R50、R52、R53、R55、R56、R57、R58、R59、R60、R61、F54、F55、F56、F57
Brilliance Bmw added the car list:
2 series F45、F46
3 series E46、E90、E91、E92、E93、F30、F31、F34、F35、F80
5series E60、E61、GT_F07、F10、F11、F18
X1series E84、F48、F49
Rolls-Royce added the car list:
Rolls-Royce RR1、RR2、RR3、RR4、RR5
IMMO:
1. Toyota:
Added smart key system Type 4(H)
Added American standard G chip all keys lost
Added American standard H chip all keys lost
2. NISSAN:
Added 12-digit pincode calculator
Added 2017 X-Trail smart key system
3. Mitsubishi:
Added Pajero 2010- non-smart key programming
Added remote control key programming Type 9
Added Asia Lancer EX key programming
4. GM:
Added Buick Excelle (Hideo) 2017- smart key programming
Added Buick Regal 2017- smart key programming
Added Chevrolet Cruze 2017- smart key programming
Added Chevrolet Equinox (Explorer) 2017- smart key programming
5. Mercedes-Benz:
Added Mercedes-Benz E-series 213(2017) tailgate control system
Added Mercedes-Benz S-series 221 tailgate control system
6. Opel:
Added Opel Antara IMMO system
Added Opel Astra-F/Astra-J IMMO system
Added Opel Corsa-E IMMO system
Added Opel Meriva-A/Meriva-B IMMO system
Added Opel Mokka IMMO system
Added Opel Vivaro IMMO system
Added Opel Zafira-A IMMO system
7. Mazda:
Added Mazda MX-5 2017- smart key programming
8. Fiat:
Added Fiat 124 Spyder smart key system
9. Mitsubishi:
Added Mirage 2013 smart key programming (all keys lost)
Cluster Calibrate:
1. Hyundai added:
Accent: 2018 D70F3536
Caeta: D70F3536
GENESIS: 2015 D70F3536
2. KIA added:
Rio: 2017 D70F3423
Sorento: D70F3526
SOUL: 2017 D70F3536
SPORTAGE GT: 2016 D70F3526+25160
3. Chrysler added:
Patriot 2014-
4. VW added:
VW GOLF SPROTSVAN NEC35XX(MQB) 2014.06-
VW GOLF 7 NEC35XX(MQB) 2014.06-
VW PASSAT B8 NEC35XX(MQB) 2014.06-
VW POLO NEC35XX(MQB) 2014.06-
VW TIGUAN NEC35XX(MQB) 2014.06-
VW TOURAN NEC35XX(MQB) 2014.06-
Skoda FABIA NEC35XX(MQB) 2014.06-
Skoda OCTAVIA NEC35XX(MQB) 2014.06-
Skoda RAPID NEC35XX(MQB) 2014.06-
Skoda SUPERB NEC35XX(MQB) 2014.06-
Seat IBIZA NEC35XX(MQB) 2014.06-
Seat LEON NEC35XX(MQB) 2014.06-
Seat TOLEDO NEC35XX(MQB) 2014.06-
Audi A3 NEC35XX(MQB) 2014.06-
Audi Q2 NEC35XX(MQB) 2014.06-
Special Function:
TPMS diagnosis system function added :
Buick/Cadillac/Chevrolet/Alfa Romeo/Peugeot/Fiat/Citroen/Jaguar/Land Rover
Oil/Service Reset Function Added:
1. Ferrari
Automatic Reset: 599 GTO F141 GTO
2. Hyundai
Automatic Reset: Genesis DH(2014-2015), i10(IA)(2014-2015), i20(GB)(2015), i20(IB)(2015), Sonata LF(2015)
Manual Reset: Mistra
3.KIA
Automatic Reset:
Cadenza(VG)(2013-2015), Carens/Rondo(RP)(2014-2015), Cerato/Forte(YD)(2013-2015)
Quoris(KH)(2013-2015), Soul EV(PS EV)(2015), Soul(PS)(2014-2015)
4. Toyota
Manual Reset:
4Runner(2003,2014), Avalon(2006-2007), Camry Hybrid(2006-2009), Highlander(2012-2014),
Matrix(2004), Previa(1991-1997), Prius(2001-2009), Prius(Generation 2 XW20)(2003-2008),
Prius(Generation 3 XW20)(2009-2013), Rav4(Generation 3 XA30)(2009-2013), Sequoia(2001-2003), Sienna(1998-2003), Solara(2006-2008), Solara(Generation 2)(2004-2008), Tacoma 2(2004-2014),
Tundra 2(2005-2014), Venza(2008-2013), Yaris(2009-2010,2011-2013), other areas(North America,Others)
5. Geely
Automatic Reset: KC-1,GS。
Manual Reset: Emgrand GL。
6. Chery
Automatic Reset: MC22
7. Roewe
Automatic Reset: new 550, new 550 hybrid power, new 750, new 750 hybrid power, eRX5
8. MG
Automatic Reset: GT(1.5/1.4L)
9. FORD
Manual Reset:
Edge(2013(2.0T)), ESCAPE(2005-2007, 2010), Explorer Sport trac(1999-2001,2002-2003,2004-2005,2006-2007), Fiesta(2003,2004-2010,2012)
Focus, Maverick(2009-2013), MONDEO(Ohter), New MONDE0(2014), Taurus(2008-2010)
10. LINCOLN
Manual Reset:
viator(2002-2005), LS(2000,2001-2005), MKS(2009-2010,2011,2012), MKT(2009,2010-2011,2012), MKZ(2012), MKZ HYBIRD(2011-2012), Navigator(2011-2012)
Navigator L(2007-2012), Town Car(2003-2005,2011)
11. Mercury
Manual Reset:
Grand Marquis(2006-2011), Mariner(2005-2007,2008-2011), Mark VIII(1993-1998), Milan(2010-2011), Montego(2005-2007), Monterey(2004-2007), Mountaineer(2005,2006-2007,2008-2010), Sable(2003-2005,2008-2009)
12. Mercedes-Benz
Automatic Reset:
(1). CLC-chassis
(2). E-chassis(CLASS):238, 213
(3). V series: Vaneo 414, SPRINTER II, 690.6(OBDII), New VITO/V class(447/448)
13. MINI
Automatic Reset: F54, F57
14. GREATWALL
Automatic Reset: H9(China)
15. Land Rover
Automatic Reset:
(1).Discovery 3:Normally aspirated V6, Normally aspirated V8, Diesel V6
(2).Discovery 4:
2010-2011:Normally aspirated V6, Normally aspirated V8 5.0L, Diesel V6 2.7L, Diesel V6 3.0L
2012-2013:Normally aspirated V8 5.0L, Diesel V6 2.7L, Diesel V6 3.0L
2014-2016:Diesel V6 3.0L, Supercharged V6 3.0L
(3).Discovery Sport:
2015-2016:Diesel I4 2.2L, Diesel I4 2.0L, GIDI 2.0L
(4).New Range Rover
2013:Diesel V8 4.4L, Diesel V6 3.0L, Normally aspirated V8 5.0L, Supercharged V8 5.0L
2014-2015:Diesel V8 4.4L, Diesel V6 3.0L, Normally aspirated V8 5.0L, Supercharged V8 5.0L, Supercharged V6 3.0L, Hybrid 3.0L, Petrol GTDi 2.0L
2016:Diesel V8 4.4L, Diesel V6 3.0L, Normally aspirated V8 5.0L, Supercharged V8 5.0L, Supercharged V6 3.0L, Hybrid 3.0L, Petrol GTDi 2.0L
(5).Range Rover
Evoque Convertible, Diesel I4 2.2L(2016), Petrol GTDI 2.0L(2016), Diesel I4 2.0L(2016)
16. Volvo
Automatic Reset: S90(2017-), S90L(2017-), V90(2017-), XC90(2016-)
17. GM
Manual Reset:
(1). BUICK: Terraza(1995-1997,2005-2007)
(2). CADILLAC: CTS(2007-2009), SRX(2007-2009), STS(2005-2010)
(3). CHEVROLET: Tahoe(2000-2006)
(4). GMC:Yukon (2000-2006)
Car Body Setting Function:
Added AUDI Q7_ RVC _4M0-980-566 parameter
Added AUDI A4 B9A4(201605-) right front door folding
Added AUDI A4 B9A4(201605-) left front door folding
http://www.key-programmer.org/2018/01/17/obdstar-x300-dp-updated-bmw-fem-bdc-for-free/
 https://eobd21.files.wordpress.com/2018/01/bmw-ews3-2d47j-1.jpg?w=150 150w, https://eobd21.files.wordpress.com/2018/01/bmw-ews3-2d47j-1.jpg?w=300 300w" sizes="(max-width: 600px) 100vw, 600px" />
  https://eobd21.files.wordpress.com/2018/01/bmw-ews3-2d47j-2.jpg?w=84 84w, https://eobd21.files.wordpress.com/2018/01/bmw-ews3-2d47j-2.jpg?w=168 168w" sizes="(max-width: 600px) 100vw, 600px" />
 https://eobd21.files.wordpress.com/2018/01/bmw-ews3-2d47j-3.jpg?w=150 150w, https://eobd21.files.wordpress.com/2018/01/bmw-ews3-2d47j-3.jpg?w=300 300w" sizes="(max-width: 600px) 100vw, 600px" />
 https://eobd21.files.wordpress.com/2018/01/bmw-ews3-2d47j-4.jpg?w=84 84w, https://eobd21.files.wordpress.com/2018/01/bmw-ews3-2d47j-4.jpg?w=168 168w" sizes="(max-width: 600px) 100vw, 600px" />
 https://eobd21.files.wordpress.com/2018/01/bmw-ews3-2d47j-5.jpg?w=84 84w, https://eobd21.files.wordpress.com/2018/01/bmw-ews3-2d47j-5.jpg?w=169 169w" sizes="(max-width: 600px) 100vw, 600px" />
 https://eobd21.files.wordpress.com/2018/01/bmw-ews3-2d47j-6.jpg?w=84 84w, https://eobd21.files.wordpress.com/2018/01/bmw-ews3-2d47j-6.jpg?w=169 169w" sizes="(max-width: 600px) 100vw, 600px" />
 https://eobd21.files.wordpress.com/2018/01/bmw-ews3-2d47j-7.jpg?w=150 150w, https://eobd21.files.wordpress.com/2018/01/bmw-ews3-2d47j-7.jpg?w=300 300w" sizes="(max-width: 600px) 100vw, 600px" />
 https://eobd21.files.wordpress.com/2018/01/bmw-ews3-2d47j-8.jpg?w=150 150w, https://eobd21.files.wordpress.com/2018/01/bmw-ews3-2d47j-8.jpg?w=300 300w" sizes="(max-width: 600px) 100vw, 600px" />
 https://eobd21.files.wordpress.com/2018/01/mini-vci-etacs-1.jpg?w=150&h=84
 https://eobd21.files.wordpress.com/2018/01/mini-vci-etacs-2.jpg?w=134&h=150
 https://eobd21.files.wordpress.com/2018/01/mini-vci-etacs-3.jpg?w=150&h=133
 https://eobd21.files.wordpress.com/2018/01/mini-vci-etacs-7.jpg?w=150&h=121
 https://eobd21.files.wordpress.com/2018/01/mini-vci-etacs-4.jpg?w=150&h=122
 https://eobd21.files.wordpress.com/2018/01/mini-vci-etacs-5.jpg?w=150&h=136
 https://eobd21.files.wordpress.com/2018/01/mini-vci-etacs-6.jpg?w=150&h=113
 https://eobd21.files.wordpress.com/2018/01/xtuner-cvd-scanners.png?w=150&h=67
 https://eobd21.files.wordpress.com/2018/01/xtuner-cvd-comparison.png?w=150&h=73
 https://eobd21.files.wordpress.com/2018/01/ktag-7-020-sd-method-1.jpg?w=128
 https://eobd21.files.wordpress.com/2018/01/ktag-7-020-sd-method-2.jpg?w=129
 https://eobd21.files.wordpress.com/2018/01/ktag-7-020-sd-method-3.jpg?w=128
 https://eobd21.files.wordpress.com/2018/01/ktag-7-020-sd-method-4.jpg?w=129
 https://eobd21.files.wordpress.com/2018/01/ktag-7-020-sd-method-5.jpg?w=130
 https://eobd21.files.wordpress.com/2018/01/ktag-7-020-sd-method-6.jpg?w=130
 https://eobd21.files.wordpress.com/2018/01/ktag-7-020-sd-method-7.jpg?w=130
 https://eobd21.files.wordpress.com/2018/01/ktag-7-020-sd-method-8.jpg?w=130
 https://eobd21.files.wordpress.com/2018/01/ktag-7-020-sd-method-9.jpg?w=129
 https://eobd21.files.wordpress.com/2018/01/ktag-7-020-sd-method-10.jpg?w=129
 https://eobd21.files.wordpress.com/2018/01/ktag-7-020-sd-method-11.jpg?w=129
 https://eobd21.files.wordpress.com/2018/01/ktag-7-020-sd-method-12.jpg?w=130
 https://eobd21.files.wordpress.com/2018/01/ktag-7-020-sd-method-13.jpg?w=129
 https://eobd21.files.wordpress.com/2018/01/ktag-7-020-sd-method-14.jpg?w=129
 https://eobd21.files.wordpress.com/2018/01/ktag-7-020-sd-method-15.jpg?w=130
 https://eobd21.files.wordpress.com/2018/01/ktag-7-020-sd-method-16.jpg?w=131
 https://eobd21.files.wordpress.com/2018/01/ktag-7-020-sd-method-17.jpg?w=130
 https://eobd21.files.wordpress.com/2018/01/ktag-7-020-sd-method-18.jpg?w=129
 https://eobd21.files.wordpress.com/2018/01/ktag-7-020-sd-method-19.jpg?w=130
 https://eobd21.files.wordpress.com/2018/01/ktag-7-020-sd-method-20.jpg?w=129
 https://eobd21.files.wordpress.com/2018/01/ktag-7-020-sd-method-21.jpg?w=129
 https://eobd21.files.wordpress.com/2018/01/ktag-7-020-sd-method-22.jpg?w=129
 https://eobd21.files.wordpress.com/2018/01/ktag-7-020-sd-method-23.jpg?w=130
 https://eobd21.files.wordpress.com/2018/01/ktag-7-020-sd-method-24.jpg?w=130
 https://eobd21.files.wordpress.com/2018/01/ktag-7-020-sd-method-25.jpg?w=129
 https://eobd21.files.wordpress.com/2018/01/ktag-7-020-sd-method-26.jpg?w=131
 https://eobd21.files.wordpress.com/2018/01/ktag-7-020-sd-method-27.jpg?w=129
 https://eobd21.files.wordpress.com/2018/01/ktag-7-020-sd-method-28.jpg?w=129
 https://eobd21.files.wordpress.com/2018/01/ktag-7-020-sd-method-29.jpg?w=129
 https://eobd21.files.wordpress.com/2018/01/ktag-7-020-sd-method-30.jpg?w=130
 https://eobd21.files.wordpress.com/2018/01/ktag-7-020-sd-method-31.jpg?w=129
 https://eobd21.files.wordpress.com/2018/01/ktag-7-020-sd-method-32.jpg?w=129
 https://eobd21.files.wordpress.com/2018/01/ktag-7-020-sd-method-33.jpg?w=131
 https://eobd21.files.wordpress.com/2018/01/ktag-7-020-sd-method-34.jpg?w=129
 https://eobd21.files.wordpress.com/2018/01/ktag-7-020-sd-method-35.jpg?w=130
 https://eobd21.files.wordpress.com/2018/01/ktag-7-020-sd-method-36.jpg?w=128
 https://eobd21.files.wordpress.com/2018/01/ktag-7-020-sd-method-37.jpg?w=129
 https://eobd21.files.wordpress.com/2018/01/ktag-7-020-sd-method-38.jpg?w=129
 https://eobd21.files.wordpress.com/2018/01/kess-5-028-ksuite-2-34-logo.jpg?w=150
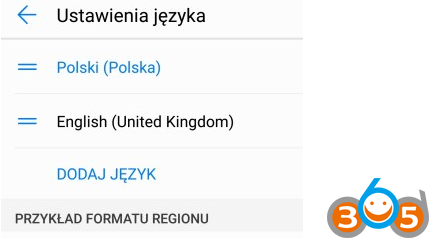 http://blog.obdii365.com/wp-content/uploads/2018/01/install-vvdi-key-tool-android-app-2-300x165.png
 http://blog.obdii365.com/wp-content/uploads/2018/01/install-vvdi-key-tool-app-1-300x190.png
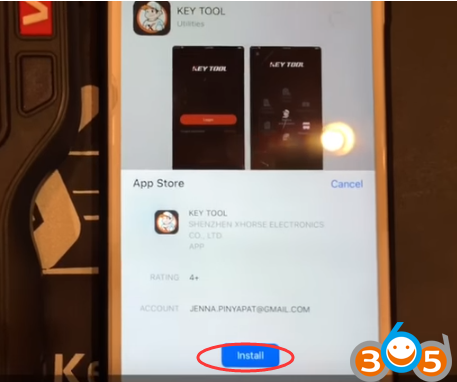 http://blog.obdii365.com/wp-content/uploads/2018/01/install-vvdi-key-tool-app-2-300x251.png
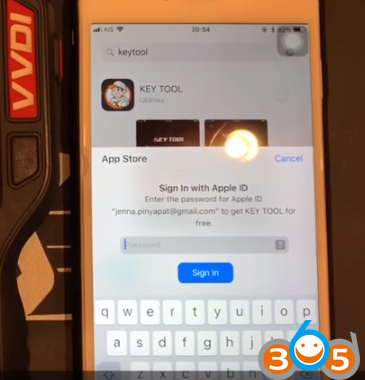 http://blog.obdii365.com/wp-content/uploads/2018/01/install-vvdi-key-tool-app-3-288x300.png
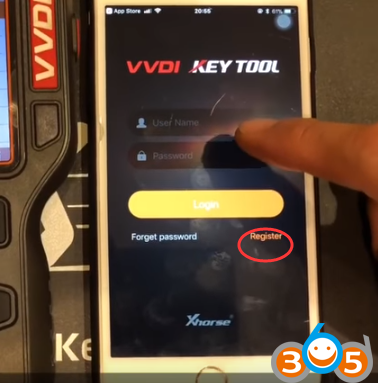 http://blog.obdii365.com/wp-content/uploads/2018/01/install-vvdi-key-tool-app-4-296x300.png
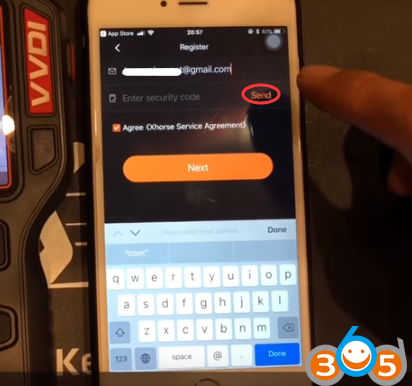 http://blog.obdii365.com/wp-content/uploads/2018/01/install-vvdi-key-tool-app-6-300x281.png
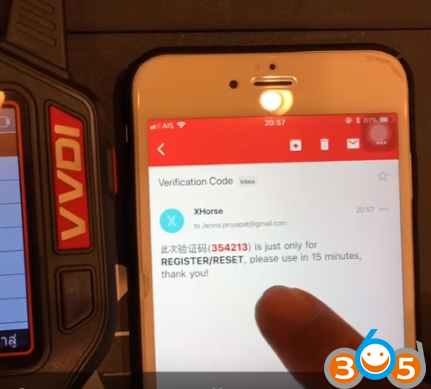 http://blog.obdii365.com/wp-content/uploads/2018/01/install-vvdi-key-tool-app-7-300x271.png
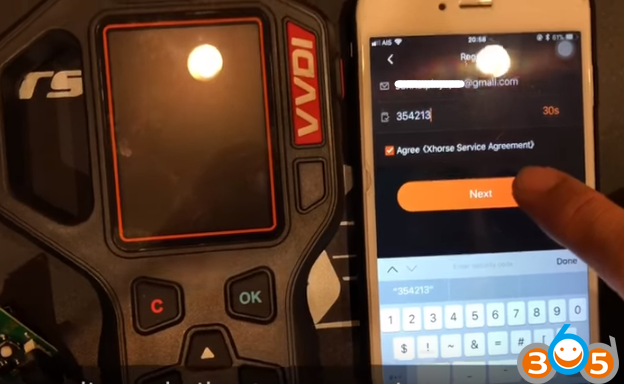 http://blog.obdii365.com/wp-content/uploads/2018/01/install-vvdi-key-tool-app-8-300x185.png
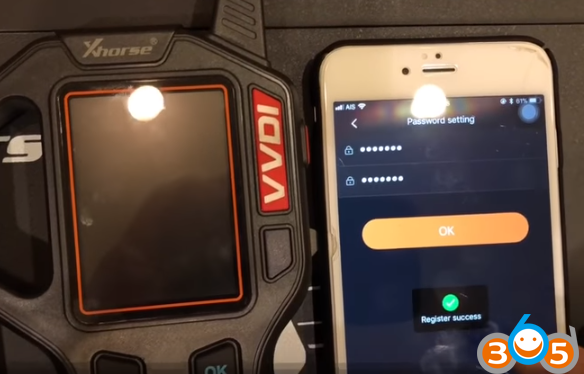 http://blog.obdii365.com/wp-content/uploads/2018/01/install-vvdi-key-tool-app-9-300x192.png
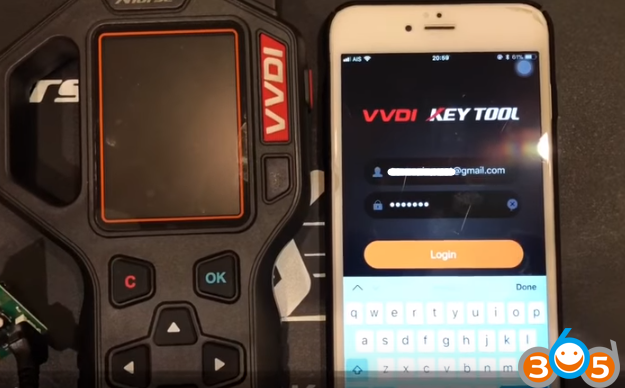 http://blog.obdii365.com/wp-content/uploads/2018/01/install-vvdi-key-tool-app-10-300x186.png
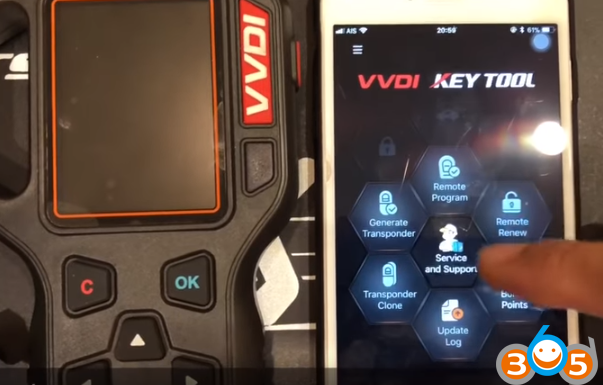 http://blog.obdii365.com/wp-content/uploads/2018/01/install-vvdi-key-tool-app-11-300x192.png
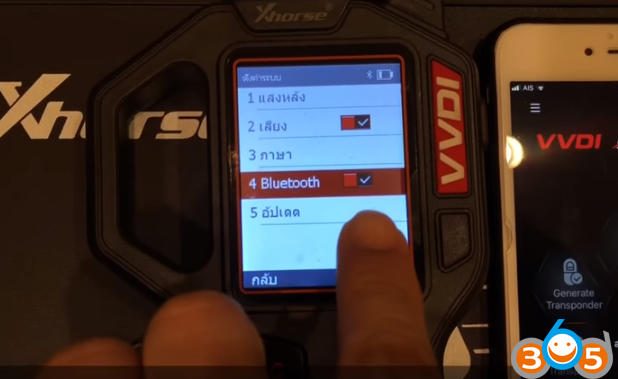 http://blog.obdii365.com/wp-content/uploads/2018/01/install-vvdi-key-tool-app-12-300x184.png
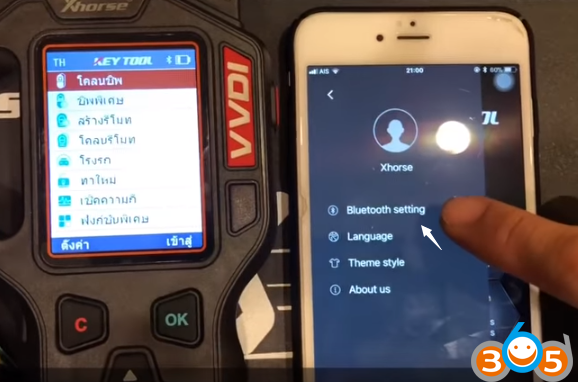 http://blog.obdii365.com/wp-content/uploads/2018/01/install-vvdi-key-tool-app-13-300x198.png
 http://blog.obdii365.com/wp-content/uploads/2018/01/install-vvdi-key-tool-app-14-300x258.png
 http://blog.obdii365.com/wp-content/uploads/2018/01/install-vvdi-key-tool-app-15-300x187.png
 http://blog.obdii365.com/wp-content/uploads/2018/01/install-vvdi-key-tool-app-16-300x183.png
 http://blog.obdii365.com/wp-content/uploads/2018/01/install-vvdi-key-tool-app-17-300x175.png
 http://blog.obdii365.com/wp-content/uploads/2018/01/install-vvdi-key-tool-app-18-300x191.png
 http://blog.obdii365.com/wp-content/uploads/2018/01/install-vvdi-key-tool-app-19-300x205.png
 http://blog.obdii365.com/wp-content/uploads/2018/01/install-vvdi-key-tool-app-20-300x172.png
 http://blog.obdii365.com/wp-content/uploads/2018/01/install-vvdi-key-tool-app-21-300x181.png
 http://blog.obdii365.com/wp-content/uploads/2018/01/install-vvdi-key-tool-app-22-300x204.png
 http://blog.obdii365.com/wp-content/uploads/2018/01/install-vvdi-key-tool-app-23-300x208.png
 http://blog.obdii365.com/wp-content/uploads/2018/01/install-vvdi-key-tool-app-24-300x193.png
