Xhorseキープログラミングツール

Xhorseキープログラミングツールのソフトウェアとハードウェアサービス

 Today I’m going to show how to unlock 2020+ Nissan Ultima or Maxima smart key with Xhorse VVDI Key Tool Max/ Key Tool Max PRO. When a Nissan OEM smart key is used on a vehicle, you’re not able to reuse it on a different car. Its circuit board will lock up. But with the Key Tool Max, you can renew or unlock the key. Now let’s get start.


As we can see, the circuit board is Locked now.

Xhorse VVDI Key Tool Max PRO Renew 2020+ Nissan Smart Key 1

Special function >> Remote Renew >> Nissan >> AES Smartkey – A232800800 5BTN 433MHz

Scroll down the screen, we can check the connection diagram.

Hook up circuit board &VVDI Key Tool Max by soldering.

Xhorse VVDI Key Tool Max PRO Renew 2020+ Nissan Smart Key 2

Xhorse VVDI Key Tool Max PRO Renew 2020+ Nissan Smart Key 3

Xhorse VVDI Key Tool Max PRO Renew 2020+ Nissan Smart Key 14

Xhorse VVDI Key Tool Max PRO Renew 2020+ Nissan Smart Key 15

Xhorse VVDI Key Tool Max PRO Renew 2020+ Nissan Smart Key 16

Xhorse VVDI Key Tool Max PRO Renew 2020+ Nissan Smart Key 17

After successfully connected, click “Unlock”.

Remote renew is in process…

Refresh successfully.


Go back to read the key again.

Key status is Unlock now.


Unlock 2020+ Nissan 433MHz smart key success.

Xhorse VVDI Key Tool Max PRO Renew 2020+ Nissan Smart Key 8

Xhorse VVDI Key Tool Max PRO Renew 2020+ Nissan Smart Key 9

Xhorse VVDI Key Tool Max PRO Renew 2020+ Nissan Smart Key 10

www.vvdishop.com


 Xhorse Multi Prog programmer new feedback from one of our customers- read and write Citroen C4 6LP2 ECU successfully.


Vehicle: Citroën C4 1.4

ECU MAGNETI MARELLI IAW 6LP2.03

Operation mode: BDM

Use BDM frame from other brands.

Multi-prog will show you the BDM wiring diagram.

Xhorse Multi Prog Read and Write Citroen IAW 6LP2 1

Xhorse Multi Prog Read and Write Citroen IAW 6LP2 2

Xhorse Multi Prog Read and Write Citroen IAW 6LP2 3

Xhorse Multi Prog Read and Write Citroen IAW 6LP2 4

Xhorse Multi Prog Read and Write Citroen IAW 6LP2 5

Xhorse Multi Prog Read and Write Citroen IAW 6LP2 6

Xhorse Multi Prog Read and Write Citroen IAW 6LP2 7

Xhorse Multi Prog Read and Write Citroen IAW 6LP2 8

Xhorse Multi Prog Read and Write Citroen IAW 6LP2 9


 Here comes the similar problem:

BMW F30 after desoldering 95128 eeprom all data lost (maybe overheated). Using xhorse vvdi prog and vvdi2.
In new eeprom i wrote data from another FEM but car now starts only from the emergency coil, remote did not works.
i try wrote many dumps from another fem. update FEM with ISTA , but remote still not working.

Tried to desolder with hot air, the eeprom may have been damaged.

Is it possible to restore data? What is the procedure to recover the FEM? Or do I need to buy new FEM?

Xhorse VVDI2 BMW FEM EEPROM Damaged with Heat

Solution:

NO NEED TO BUY ANY NEW FEM.
Find any 95128 dump make all programming FEM with vvdi2.
Restore coding
Now in car key must start only from the emergency coil.
next
At first read isn by vvdi from the working key.
Erase key with vvdi.
Dissemble key.
Renew key by vvdi key tool or vvdi prog.
Program “old” -new key with vvdi2.

Also if it is manual gearbox you will need to virginize the elv.
AND ALL !!!!

You can also restore FEM with autohex, same procedure as above.

For the guys wondering why when a FEM flash fails you cannot fix it.

FEM has 2x SWFL, they control the ignition, if both SWFL become corrupted then the FEM does.
not know when and how to cycle the ignition, this is why you hear the relays clicking, if the bootloader is ok you may be able to restore the SWFL by updating istep, if the BTLD is corrupted then its likely a new FEM

if only 1 SWFL is corrupted and the other is ok then the FEM can be restored.


You also have other ways to program BMW FEM key, via clip solder free adapter or with bench test platform.

For example:

Program BMW F30 FEM All Keys Lost via Godiag


User feedback:

Car worked after writing file to new eeprom. Vvdi2 also let me correct the mileage.


 Xhorse VVDI Key Tool Plus Program BMW F30 FEM All Keys Lost via Godiag FEM/BDC test platform successfully.


You cannot do it via obd fem. You opened fem module to read and write eeprom files.

You can do bench via godiag test platform.


Procedure:

1.Backup coding
2.Service mode, read eeprom data, load eeeprom and prepare service EEPROM, write service
EEPROM data, restore FEM/BDC shell, provide 12V+ and connect OBD.
3.Unlock FEM
4. Write back EEPROM
5. Recovery coding

If you read the warning it says if obd pre processing you can ignore that.

Images attached:

VVDI Key Tool Plus Program BMW F30 All Keys Lost 1

VVDI Key Tool Plus Program BMW F30 All Keys Lost 2

VVDI Key Tool Plus Program BMW F30 All Keys Lost 3

VVDI Key Tool Plus Program BMW F30 All Keys Lost 4

VVDI Key Tool Plus Program BMW F30 All Keys Lost 5

VVDI Key Tool Plus Program BMW F30 All Keys Lost 6

VVDI Key Tool Plus Program BMW F30 All Keys Lost 7

VVDI Key Tool Plus Program BMW F30 All Keys Lost 8


 Problem:

Tried to read MQB 3525 cluster with vvdi key tool plus and MQB solder free adapter, but kept showing error ‘chip crack failed’. Any solution?

Xhorse MQB Solder Free Adapters Chip Crack Failed 1

Xhorse MQB Solder Free Adapters Chip Crack Failed 2

Solution:

If had a chip crack failed error when using xhorse MQB adapters, do a test 57 (Other/Test Function 57).

Xhorse MQB Solder Free Adapters Chip Crack Failed 3

Xhorse MQB Solder Free Adapters Chip Crack Failed 4

Xhorse MQB Solder Free Adapters Chip Crack Failed 5

Xhorse MQB Solder Free Adapters Chip Crack Failed 6

If 57 test function is ok, the MQB adapter is fine. Double check the connection and don’t forget to give power to mqb adapter. Subscribe our youtube channel and check video instructions.

If 57 test function is not ok, there maybe something wrong with the adapter. Take a video and send it to your dealer for analysis.


www.vvdishop.com


 Good news. Xhorse MVCI Pro was tested working with Mitsubishi MUT-III 23061-00 [2023 version] software.


NOTE: MVCI Pro here was only used as J2534 adapter because it does not have Mitsubishi driver if as OEM emulator.


You need:

Xhorse MVCI Pro J2534

Mitsubishi MUT-III 2023.06 software

Download ‘common‘ replacement file.

Operating system: Win10 64bit


How to set up mvci pro j2534 passthru for Mitsubishi MUT-III 2023.06?

Install MUT-III software and mvci pro driver.

Right click on mut3se shortcut, open file location, go one folder back to see the common folder.
Rename the common folder to anyname like commonORI for example.
Extract the common.rar to same location and start your mut3se from your desktop shortcut.

Xhorse MVCI Pro with Mitsubishi MUT-III 2023.06 1

Xhorse MVCI Pro with Mitsubishi MUT-III 2023.06 2

Xhorse MVCI Pro with Mitsubishi MUT-III 2023.06 3

Xhorse MVCI Pro with Mitsubishi MUT-III 2023.06 4

Xhorse MVCI Pro with Mitsubishi MUT-III 2023.06 5

Video reference:

Test on 2007 Outlander

NOTE:

MVCI Pro should also work with 2022 version MUT-3 software but use different replace files.


 What is the difference between Xhorse XDKP91GL Nissan 40 PIN cable and XDKP36GL Nissan 16+32 cable?

Xhorse Nissan 40 PIN Cable vs Nissan 16+32 Cable 1


Xhorse XDKP36GL Nissan 16+32 cable

  • Applicable to Sylphy, Sentra Models with B18 Chassis from year 2020.08-2021.07
  • Supports add key bypass pin code
  • All keys lost require pin code from 3rd party


Xhorse XDKP91GL Nissan 40 PIN cable


  • Applicable to Sylphy, Sentra Model B18 from 2021.8– to latest
  • Supports add key bypass pin code
  • Supports all keys lost bypass pin code. (with J3 & J3 connectors)
Xhorse Nissan 40 PIN Cable vs Nissan 16+32 Cable 2

Xhorse Nissan 40 PIN Cable vs Nissan 16+32 Cable 3

Both cables can be used with vvdi key tool plus ONLY.

40 PIN cable will do Nissan B18 from 2021.08 onwards, 16+32 pin cable supports 2020-2021 B18 models.

40 PIN cable will do both add key and all keys lost bypass pin code. 16+ 32 pin cable supports add key only.


 Today we’re taking about 6 new features of Xhorse Condor XC-002 Pro manual key cutting machine.


  1. LED Light & Speed Display

Power up the machine, and turn on the power switch. And you’ll notice the LED light in the front will turn on, the speed display will also light up.

xhorse condor xc-002 pro new feature 1

xhorse condor xc-002 pro new feature 2

  1. Easier Probe & Cutter Installation

The Condor XC-002 Pro offers an easier way to install probes and cutters. There’s no need to use an Allen wrench to install the probe and the cutter anymore.


What we need to do is simply pull the lock switch to make sure it’s unlocked. Insert the probe all the way up and pull to lock the switch.


The installation of the cutter is the same. Loosen the lock switch, insert and hold the cutter and lock the switch.


The innovative method not only makes the installation more convenient, but also ensures the automatic centering and clamping of the probe and the cutter avoiding center deviation caused by traditional method. And greatly improving the accuracy and reliability of cutting.

xhorse condor xc-002 pro new feature 3

xhorse condor xc-002 pro new feature 4

  1. Cutter Power Switch & Speed Control Knob.

After powering up the machine, when we press down the main handle, you can see the cutter actually is not spinning.


What we need to do is turn on the cutter power switch at the right side. Press down the handle, you can see the cutter is spinning immediately. We rotate the handle clockwise to lock it. And rotate this knob to adjust the speed of the cutter.


XC-002 Pro now offers seven speeds to facilitate your work.

xhorse condor xc-002 pro new feature 5

xhorse condor xc-002 pro new feature 6

  1. Mode Switch Knob

The red knob on top is the mode switch knob, which allows you to switch between dimple mode and standard mode.


We rotate the knob to switch to the dimple mode, now the probe can move up and down to detect the depth of the holes on the key. The mode is mainly used to duplicate dimple keys. When the knob directs at standard mode, we can cut double sided, single sided, 4 track external, 2 track external, 4 track internal, channel track keys.


BTW, there’s a QR code here, scan it to view the Condor XC002 Pro tutorials. If you encounter problems, you no longer have to rush online to search for videos. This is very convenient.

xhorse condor xc-002 pro new feature 7

xhorse condor xc-002 pro new feature 8

xhorse condor xc-002 pro new feature 9

xhorse condor xc-002 pro new feature 10

  1. New Clamp

This is a newly-designed clamp for Condor XC-002 Pro.


Slide in the clamp, and make sure the mark at the bottom of the machine points to the little triangle of C, B or A on the clamp. You can adjust the position to your needs, then tighten the knob.


Condor XC-002 Pro features 3 groove for key clamping. The left one can be used to clamp edge cut keys. This is a guiding block, used to assist us to clamp edge cut keys. Insert the guiding block. And we have an edge cut key here. Now we insert the key and make sure it is aligned using a shim. Tighten the clamp knob. Then we can hold the main handle and press down to start cutting. The silver handle beside the sub-handle in our left can be used to assist out cutting.


The middle groove can be used to cut internal cut keys. Insert the key, then tighten the clamp knob. Loosen the black locking knobs behind the clamp. Rotate the clamp to 45°and lock it. We usually use the right groove to hold thin house keys like this one. Loosen the black locking knobs, and return the clamp to its normal flat state.


Additionally, each of the three grooves has its recommended clamp mounting location. For example, when you use the left groove, it is recommended to fix the clamp at point C. The middle groove corresponds to point B. The right groove corresponds to point A. Of course, you can also adjust the position of the clamp according to your operating habits.

xhorse condor xc-002 pro new feature 11

xhorse condor xc-002 pro new feature 12

xhorse condor xc-002 pro new feature 13

xhorse condor xc-002 pro new feature 14

xhorse condor xc-002 pro new feature 15

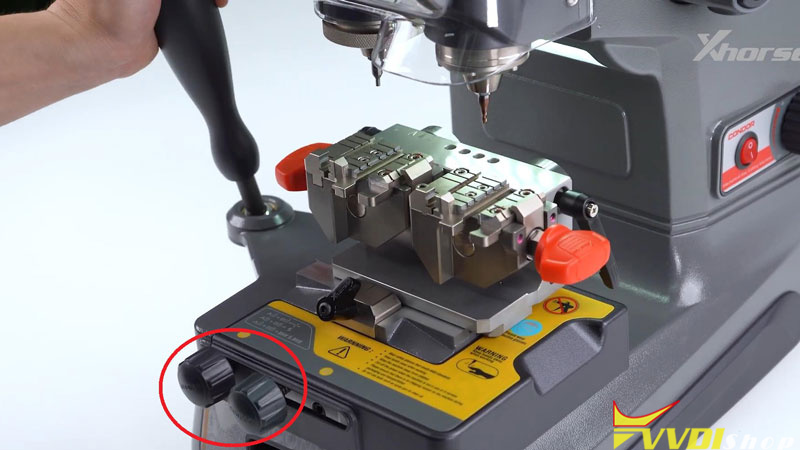
  1. Movement Of The Cutting Platform

When these 2 limitation knobs are fully released, the cutting platform can be moved freely.


And if we only tighten the right knob, the cutting platform can only move along Y-axis. However, when moving along X-axis, the platform will always go back to its original position after you release the handle.


If both knobs are tightened, the cutting platform can only move along Y-axis. And the X-axis movement is completed locked. This can help us when cutting some keys that require linear cutting.

xhorse condor xc-002 pro new feature 16

www.vvdishop.com


 Problem:

Opel Corsa D all keys have lost. Try to add key with autel failed.

Delete dtc with autel. Try to add key with xhorse vvdi key tool plus,  Pin code extract successfully but have this error when program key.

Program Opel Corsa D All Keys Lost with VVDI Key Tool Plus

Solution:

You use the wrong key.

Opel Corsa D/Opel Astra H special key remote. You cannot use Xhorse or KD remote.

The correct one is Delphi system for Corsa D.  Vvdi or kd remote does not work well with opel/vauxhall.

Have to use original or aftermarket key. 

Ignition on wait 15 min and will work.


www.vvdishop.com


 Will Xhorse vvdi key tool plus read BMW CAS4+ (engine N63) ISN code? via OBD or Bench?


Yes, it will read N63 ISN on bench.

Don’t enter from Programmer->BMW menu.

Go to Prog->ECU->BMW

Xhorse VVDI Key Tool Plus Read BMW N63 ISN 1

Drop down and select F engine MEVD1728 (N63/S63)

Xhorse VVDI Key Tool Plus Read BMW N63 ISN 2

You need Bosch ECU adapter XDNP30 to read ISN.

Xhorse VVDI Key Tool Plus Read BMW N63 ISN 3

Key tool plus will show to wiring diagram to connect ECU adapter and ECU

Xhorse VVDI Key Tool Plus Read BMW N63 ISN 4

Xhorse VVDI Key Tool Plus Read BMW N63 ISN 5

Xhorse VVDI Key Tool Plus Read BMW N63 ISN 6

Then follow the prompts to read ISN code.

www.vvdishop.com


< 2024年05月 >
S M T W T F S
      1 2 3 4
5 6 7 8 9 10 11
12 13 14 15 16 17 18
19 20 21 22 23 24 25
26 27 28 29 30 31  
カテゴリ
QRコード
QRCODE

アクセスカウンタ
読者登録
メールアドレスを入力して登録する事で、このブログの新着エントリーをメールでお届けいたします。解除は→こちら
現在の読者数 0人
プロフィール
jtac
jtac