Xhorseキープログラミングツール

Xhorseキープログラミングツールのソフトウェアとハードウェアサービス

 If you cannot turn on Xhorse Condor XC-Mini, Condor XC Mini Plus or Condor II key cutting machine, you may need to test the 24v voltage output of the battery to check if needs a battery replacement.

Test Xhorse Condor Mini Battery Voltage 1

Follow this way to test Xhorse Condor battery:

1.Remove these screws to take out the battery.

Test Xhorse Condor Mini Battery Voltage 2

2.Connect 220V power supply on the top

Test Xhorse Condor Mini Battery Voltage 3

Only when 220V power supply is plugged in at the top, you can measure 24V voltage output at the bottom. If you power the 220V but cannot measure 24V voltage, there is a problem with the battery or power supply.  If there is no 24V voltage output, the battery does not charge and needs to be replaced.

Test Xhorse Condor Mini Battery Voltage 4

Test Xhorse Condor Mini Battery Voltage 5

 If Xhorse VVDI Mini OBD tool asks to update the firmware to V1.5.0 or above using the Xhorse Upgrade kit, here are the upgrade tips.  Update is done via Upgrade kit from PC (not phone).

Update Xhorse VVDI Mini OBD Tool to 1.5.0 1

First of all, update Xhorse upgrade kit to 1.8.2 online or directly install Upgrade kit 1.8.2.

Select device as MiniOBD1 and version 1.5.0.

Update Xhorse VVDI Mini OBD Tool to 1.5.0 2

Press Upgrade.

Update Xhorse VVDI Mini OBD Tool to 1.5.0 3

Update Xhorse VVDI Mini OBD Tool to 1.5.0 4

Update Xhorse VVDI Mini OBD Tool to 1.5.0 5

Update Xhorse VVDI Mini OBD Tool to 1.5.0 6

Update Xhorse VVDI Mini OBD Tool to 1.5.0 7

Update firmware successfully.

Update Xhorse VVDI Mini OBD Tool to 1.5.0 8

If it is not possible to update from the Upgrade kit on PC, for example Win11, you may need to install the xhorse upgrade kit system driver.

Update Xhorse VVDI Mini OBD Tool to 1.5.0 9

Update Xhorse VVDI Mini OBD Tool to 1.5.0 10

Update Xhorse VVDI Mini OBD Tool to 1.5.0 11

Then update Upgrade kit to 1.8.2

Update Xhorse VVDI Mini OBD Tool to 1.5.0 12

Update Xhorse VVDI Mini OBD Tool to 1.5.0 13

Then update xhorse mini obd tool to 1.5.0.

Update Xhorse VVDI Mini OBD Tool to 1.5.0 14

Update Xhorse VVDI Mini OBD Tool to 1.5.0 15

www.vvdishop.com

 Here we’re taking about how to read VW/Audi BCM2 module with Xhorse Multi-Prog Programmer without soldering. The Audi BCM2 Solder Free Adapter &VVDI2 will also be required.


Open Multi-Prog software,

Device >> Selected BCM2 model: LOCK_BCM2-2(ADAPTER)(AUDI->AUDI) >> OK >> Details >> General info/ Connection diagram

Here we can get the adapter info and connection guide.


Connect Solder Free Adapter, BCM2 module and MultiProg programmer.

Power the adapter.

Connect to VVDI2.

Read DATA1 and save the data file.

Xhorse Multi Prog Read Audi BCM2 with Solder Free Adapter 1

Xhorse Multi Prog Read Audi BCM2 with Solder Free Adapter 2

Xhorse Multi Prog Read Audi BCM2 with Solder Free Adapter 3

Xhorse Multi Prog Read Audi BCM2 with Solder Free Adapter 4

Xhorse Multi Prog Read Audi BCM2 with Solder Free Adapter 5

Open VVDI2 software,

VW >> Key learn >> Fifth immobilizer system >> Step1: Show BCM2 information >> Load DATA1 file >> Confirm vehicle info

It will show this BCM2 supports continuing Step2.

Xhorse Multi Prog Read Audi BCM2 with Solder Free Adapter 6

Xhorse Multi Prog Read Audi BCM2 with Solder Free Adapter 7

Xhorse Multi Prog Read Audi BCM2 with Solder Free Adapter 8

Go back to Multi-Prog.

Read and save DATA2 file.

Continue with Step2: Get BCM2 immo data >> Load DATA2 file

VVDI2 will calculate the immo data of the module.

Click OK to save the immo data. The file can be used in dealer key generation and key learning.

We also need to save the service data that must be written back to BCM2 with Multi-Prog. Otherwise, the module cannot function properly.

Xhorse Multi Prog Read Audi BCM2 with Solder Free Adapter 9

Xhorse Multi Prog Read Audi BCM2 with Solder Free Adapter 10

Xhorse Multi Prog Read Audi BCM2 with Solder Free Adapter 11

Xhorse Multi Prog Read Audi BCM2 with Solder Free Adapter 12

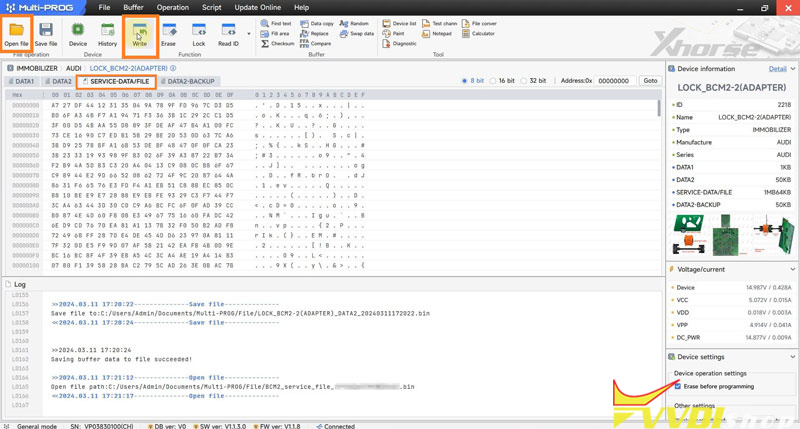
Switch to SERVICE-DATA/FILE in Multi-Prog,

Open file >> Load service data file >> Write

Chip writing success.


After installing the BCM2 module, it will work normally.

Done.

Xhorse Multi Prog Read Audi BCM2 with Solder Free Adapter 13

www.vvdishop.com

 Xhorse Multi Prog released new database version on March 18th, 2024.


Software Version 1.1.3.0

Firmware version V1.1.8

Database V12
2024-03-18 11:30:10
* Some options wiring diagrams increase pull-up resistance
* Added chip id identification for some options
* Added the boot wiring diagram of FCA_MARELLI_9DF in ECU
* The processing flow of PSA_DELPHI_DCM6.2A etc. is optimized in ECU
* Fix MC9S12XE partition some bugs.
* Repair Tesla battery(MM9Z1J638)  option in <OTHER>-><Tesla>
* Modify FORD-ECU(AM29BDD160GB) option in <ECU>-><Ford>
* Modify HYUNDAI(2005-2008)(AM29BDD160GB), SONATA(2009-2010)(S29CDO16J) options in <ECU>-><HYUNDAI>
* Modify KIA(2005-2008)(AM29BDD160GB) option in <ECU>-><KIA>
+ The models of the read and write function modules that  support Boot mode on the ECM are as follows:
RENAULT_CONTINENTAL_SID309, PSA_DELPHI_DCM7.1A 
+ The models of the read and write function modules that  support Bench mode on the ECM are as follows:
Alfa Romeo:
1.FCA_MARELLI_MM10JA

FIAT:
1.FAL_MARELLI_6JF,FAL_MARELLI_6F3
+ Add MC9S12UF32_UNSECURED  option in  <MCU>-><Motorola>-><MOTOROLA-MC9S12>
+ Add MC68HC05E6(0G72G), MC68HC05E6(0F82B) options in  <MCU>-><Motorola>-><MC68HC(7)05>
+ Add STM32F103x8 option in <MCU>-><ST>-><STM32 Series>
+ CR16MCS9V, CR16MCT9V options in  <MCU>-><National Semiconductor>-><CR16MCxx>
+ Add CEM_R5F64524_KFD, CEM_R5F64525_KFD  options in <IMMOBILIZER>-><VOLVO>
Add MQB48-LOCK(R7F701401)-WRITE,
MQB48-LOCK(R7F701402)-WRITE,
MQB48-LOCK(R7F701407)-WRITE
options in <DASHBOARD>-><VOLKSWAGEN>-><MQB>
+ Add MALIBU AIRBAG(2014)(SPC56AP54) option in <AIRBAG>-><Chevrolet>
+ Add P5.0NA_WRITE(UART),
P5.0NA_READ(AUD),
P5.0SC_WRITE(UART),
P5.0SC_READ(AUD)
options in <ECU>-><JAGUAR>-><OTHER>
+ Add S3000_READ(AUD), S3000_WRITE(UART) options in <ECU>-><Renault>-><OTHER>
+ Add PORSCHE Lithium Battery(MM9Z1J638)  option in  <OTHER>-><Porsche>
+ Add AION-S BMS BOX(SPC5746R) option in  <OTHER>-><GACMOTOR>-><AION>
+ Add GL8 Keyless Module(SPC5602D) option in  <OTHER>-><BUICK>


www.vvdishop.com

 Problem:

I’m trying to read the 9S12XEP100 of this bcm range rover evoque with Xhorse vvdi prog. If i click on read ID it recognises the mcu, but if i read partition it reports me partition information error, and if i try to read d-flash vvdi request me so set manually the partition size, can someone help me?

Xhorse VVDI Prog 9S12XEP100 Partition Information Error

Solution:

Read all as D-flash. That bcm does not have eeprom partition. Do not format or set partition with vvdi prog. It will erase all data.

It wont erase p flash. It will erase the area you write.
First read mcu and get full backup from all data. P flash and d flash.
Then you are safe to make your job.

< 2024年03>
S M T W T F S
          1 2
3 4 5 6 7 8 9
10 11 12 13 14 15 16
17 18 19 20 21 22 23
24 25 26 27 28 29 30
31            
カテゴリ
QRコード
QRCODE

アクセスカウンタ
読者登録
メールアドレスを入力して登録する事で、このブログの新着エントリーをメールでお届けいたします。解除は→こちら
現在の読者数 0人
プロフィール
jtac
jtac